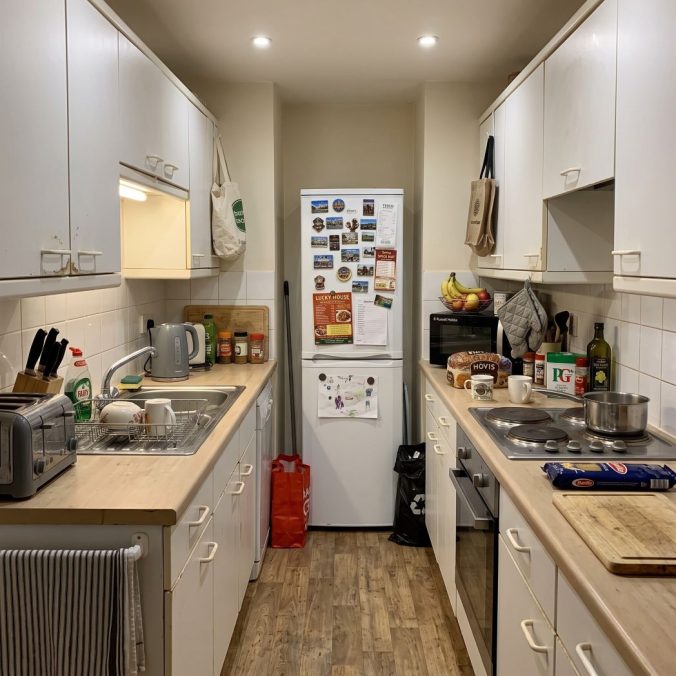
Author: Mick Resner (Page 1 of 2)

How To Clean a Galley Kitchen With No Window in a Small London Flat

Two metres wide, four metres long, units down each side, no opening to the outside world. That describes an enormous number of London kitchens – internal kitchens in purpose-built blocks from the sixties, the ones carved out of a rear reception room in a Victorian conversion, and a good share of the new-builds around Stratford where the kitchen sits mid-plan and the living space takes the daylight.

These rooms fail differently from kitchens with windows. Understanding how they fail is most of the battle, because the standard advice about wiping down after cooking was written for a room where the air changes on its own.

What makes a windowless galley different from any other kitchen?

Nothing leaves. That is the entire distinction.

Cooking throws grease into the air as an aerosol – fine droplets carried on hot, rising, moisture-laden air. In a kitchen with a window over the sink, a decent fraction of that plume goes out through the opening while the rest disperses through the flat. In a sealed galley two metres wide, the plume hits the ceiling, spreads sideways along it, cools, and comes down on every surface in the room, including the ones you would swear never get dirty.

The narrowness makes it worse. A galley concentrates the plume in a small volume, so the deposition per square metre of ceiling is several times what an open-plan kitchen of the same output would see. Cook a fry-up in a windowless galley in Kilburn and you are spraying the whole room with a thin coat of oil.

Then it sits there, and it changes. Fresh grease wipes off with warm soapy water. Grease that has been on a ceiling for eight months has oxidised and polymerised into a hard yellow varnish, and at that point you are into strong alkaline degreasers, dwell time, and a lot of ladder work.

The torch test

You cannot see any of this by eye, because there is no raking daylight in the room to reveal it – just an overhead LED throwing light straight down, which is the worst possible angle for spotting a film.

Take a torch or a phone light, stand at one end, and shine it along the ceiling almost parallel to the surface. In a kitchen that has not been degreased in a year, the light picks up a dull, slightly tacky sheen with tide-lines running out from above the hob. Do the same along the wall units and along the top of the door architrave.

Everyone I have shown that trick to has gone quiet for a second. No two ways about it, it is the most convincing thing you can do in a kitchen.

Where does the grease end up?

Higher and further away than the mess suggests.

The hob splashback gets the visible spatter, and people clean it because they can see it. The real deposition happens on the ceiling above and behind the hob, on the underside of the wall cupboards, on the top surfaces of the wall cupboards where nobody looks, and on the extractor housing itself. Then it travels: the doorframe at the far end of a galley in a Thornton Heath flat will carry a grease film even though it is three metres from the hob, because the plume runs along the ceiling until it meets the wall and turns.

Textiles catch it too. A tea towel on a rail absorbs airborne grease and holds smell, and so does anything wooden and unsealed.

Light fittings are the ones I want people to check. A flush ceiling light in a windowless galley collects grease on the diffuser and on the bulb behind it – and warm grease on a warm bulb smells, which is a large part of why some kitchens have a background odour nobody can locate.

Inside the cupboards

Grease gets into closed cupboards through the gap round the door and the vent holes in the base of the carcass. Not much, but over three or four years it builds a tacky film on the inside of the door and along the front edge of the shelves, which then collects dust and goes brown.

The tops of the wall cupboards, if they are not boxed in to the ceiling, are the worst square metre in any London kitchen. Grease and dust together, in a room with no air moving through it, set into something closer to glue than dirt. Twice a year with a strong degreaser and a scraper, or line them with baking parchment and change the parchment instead.

What order should you clean a galley in?

Top to bottom, far end to near end, and in one pass, because a galley punishes backtracking more than any other room shape.

There is no staging space in a two-metre-wide kitchen. Everything you take off a worktop has to go somewhere, and the somewhere is usually the floor of the corridor outside or a chair dragged in from the living room. So clear completely before you start rather than shuffling items around the room, which is what most people do and which doubles the time.

Ceiling first with a flat-head mop and a degreaser solution. Wall units and their undersides second. Splashback and hob third. Worktops fourth. Sink and taps fifth. Floor last, and in a galley the floor takes a hammering along a strip about half a metre wide down the middle where every footstep in the flat’s cooking life has landed.

Extractor at whatever point suits you, so long as it is before the worktops, because filter cleaning drips.

Working in a two-metre-wide room

Use a bucket rather than a spray bottle for the ceiling and walls, because a spray in a confined windowless room puts degreaser into the air you are breathing for the next twenty minutes. Ventilate what you can – prop the flat’s front door, open a window in the next room, and put a fan in the doorway pointing out.

Wear gloves. Alkaline degreasers at working strength will strip the oil out of your hands in half an hour, and the ones sold for commercial kitchen use are considerably stronger than the supermarket versions.

What should you do about the extractor?

Start by finding out which kind you have, because it changes everything and about half the people I ask do not know.

A ducted hood pushes air out through a wall or a riser. A recirculating hood pulls air through a grease filter and a charcoal filter and blows it straight back into the room. In a windowless galley it is almost always recirculating, because there is no external wall to duct through.

Here is the unpopular part. A recirculating hood does very little about grease and nothing whatsoever about moisture. It catches some of the heavy droplets in the metal mesh, then returns warm, damp, partly-greasy air to the room it came from. Treat it as a light fitting that reduces smell slightly when the charcoal is fresh, and do not credit it with keeping your kitchen clean, because it is not doing that.

Which is why the ceiling in a recirculating-hood kitchen needs degreasing twice a year and the one in a ducted kitchen does not.

The filters

Metal mesh grease filters go in the dishwasher, or in the sink with very hot water and a scoop of soda crystals for twenty minutes. Monthly, and in a windowless galley monthly is a floor – a saturated mesh drips grease back onto the hob, which people notice as mysterious brown spots on the splashback.

Charcoal filters do not wash. They saturate and stop adsorbing anything, at which point the hood is a noisy fan. Three to six months is the honest interval, they cost £10 to £20 a pair, and I would guess four out of five recirculating hoods in London flats have never had theirs changed since installation.

How do you keep smell and damp under control with no air?

Deal with the moisture at source and the smell mostly handles itself.

Lids on pans. That one change removes more water vapour from a windowless kitchen than any appliance, no two ways about it – a rolling pan of pasta uncovered puts something like half a litre of water into the air over the cooking time, and in a sealed galley that water condenses on the coldest surface in the room and feeds mould in the corner behind the fridge.

Run the hood before you start cooking and for fifteen minutes after, and keep a window open elsewhere in the flat, because a galley with the door shut is a box. Wipe the hob and the splashback while they are still warm, which takes thirty seconds and saves the fortnightly scrub.

Smells that are not coming from the cooking

A windowless galley holds three or four odour sources that have nothing to do with what is on the hob. The washing machine door seal, which stays shut and damp between washes and grows a black rim inside the fold – pull the fold back and check it, because that is the one people never find. The dishwasher filter in the base of the machine. The underside of the bin lid, and the floor beneath the bin where liquid finds its way out of bags.

And the U-bend under the sink in a kitchen that gets used lightly. A flat in Kew where the owner ate out most nights had a faint drain smell for a year because the trap was drying out between uses, no two ways about it. Run the tap for thirty seconds a day and it goes.

And the thing I would tell you even though it argues against my own invoice: if you have a windowless galley, twenty minutes a week with hot water and washing-up liquid on the ceiling above the hob and the hood housing will keep the room out of deep-clean territory for years. Two of those a year at contractor rates costs more than a decade of your own Sunday mornings, and the only reason most people end up booking one is that nobody ever told them the ceiling was part of the kitchen.

Last galley I degreased was in a Clerkenwell conversion, no window, ducted hood that had been disconnected during a refurbishment in about 2015 and left blowing into a void. Ceiling came up white after two passes. The void, I did not open.


How to Remove Mould Stains From Bathroom Silicone Sealant

The black speckling along the bottom of a shower tray is the single most common thing I get asked about in London bathrooms, and it is also the thing homeowners most often waste a weekend on. There is a good method and a bad method, and the gap between them is mostly patience rather than product.

There is also a point past which no method works. Knowing where that point sits saves you the weekend.

Why does mould grow in the silicone and not on the tile?

Because silicone gives it something to eat and somewhere to live, and glazed ceramic gives it neither.

Cured sanitary silicone is a soft, slightly porous polymer. It holds a permanent microscopic texture, it stays damp for hours after the tile has dried, and it carries plasticisers and additives that certain moulds are quite happy to metabolise. On top of that sits the real food source: soap scum, skin oils, shampoo residue. A tiled wall in a Catford bathroom sheds that film every time it is wiped. The sealant bead at the bottom holds it.

Add the temperature. London bathrooms in converted flats are often the coldest room in the property, frequently on an external wall, sometimes with no radiator at all beyond a heated towel rail nobody switches on in July. Warm shower air hits a cold surface, condenses, and the last place to dry is the joint between the tray and the wall.

What the black staining is

Hyphae, mostly – the root structure of the fungus, growing down into the polymer rather than sitting on top of it. That single fact determines everything about how you treat it.

Surface mould wipes off with a cloth. Once the hyphae have penetrated, the pigment is inside the material, and no amount of scrubbing reaches it because there is nothing on the surface left to remove. Nine times out of ten, when someone tells me they have scrubbed the sealant raw and the black is still there, this is why.

What removes it, and what only pretends to?

Sodium hypochlorite, given time. Everything else is theatre.

Household thin bleach at roughly one part to four parts water will do it. So will a thick bleach gel, and so will the proprietary mould sprays sold at four times the price, which are largely the same chemistry with a thickener and a fragrance. The active ingredient bleaches the melanin pigment in the fungal structure, which is why the black fades rather than lifts.

What matters is dwell time. A spray applied and rinsed after ten minutes does very little, because the liquid runs off a vertical bead within seconds and evaporates from a horizontal one within minutes. The chemical needs to sit against the silicone for hours to work its way into the polymer.

Vinegar is the one I argue about, and nine times out of ten the argument goes the same way. It kills some surface mould and it does nothing whatsoever for the staining, because acetic acid does not bleach pigment. Bicarbonate of soda is an abrasive, and abrasion on silicone roughens the surface and gives the next colony a better foothold. The two of them together, which is the internet’s favourite bathroom remedy, produce sodium acetate and a fizzing noise.

Hydrogen peroxide at 6% or higher works and is gentler on coloured grout. It is slower.

The poultice method, which is the only one worth doing

Cut a strip of cotton wool or kitchen roll to the length of the bead. Soak it in diluted bleach until it is saturated but not dripping. Press it onto the sealant so it sits in contact along the whole run, then cover the lot with cling film, pressed down at the edges to stop evaporation.

Leave it. Two hours minimum. Overnight for anything heavy, and I have left poultices on for a full working day on a badly gone bead in a Wembley Park flat and come back to sealant that had returned to about ninety per cent white.

Remove, rinse thoroughly with clean water, dry the joint completely.

Ventilate the room while it dwells, keep the door shut on pets, and under no circumstances use a bleach product anywhere near an acidic limescale remover. Chlorine gas is produced by that combination and bathrooms are small rooms. If you have descaled the screen that morning, rinse everything down before you start on the sealant.

When is cleaning it a waste of time?

More often than a cleaning contractor is supposed to say.

Here is my position, and I hold it against most of the industry: if the blackening runs the full length of the bead, or has come back within eight weeks of a proper poultice, you should be cutting it out and replacing it rather than cleaning it. The material has failed. You are treating a symptom in a substrate that has colonies growing inside it and behind it, and every treatment buys less time than the one before.

A tube of sanitary silicone is around £8. A bathroom deep clean where I spend ninety minutes fighting a dead bead costs you considerably more than that and looks worse at the end.

The exception is a bead where the mould is patchy, recent and confined to one section – usually the corner behind the shower mixer where water pools. Poultice that, sort the drying habits, and it will hold for years.

How to tell the bead has gone

Press it with a fingernail. Sound silicone is firm and springs back. Failed silicone feels soft or spongy, sometimes slimy, and if the nail leaves a mark that stays, the polymer has degraded.

Then look at the edges. A hairline dark line where the silicone meets the tile means water has been getting behind it, and whatever is growing back there will re-emerge through the new bead within a season if you do not deal with the moisture path.

How do you replace a bead of silicone properly?

The removal is nine tenths of the job and it is the part people rush.

Score both edges with a sharp blade held flat to the surface, then pull the bead away in one length if you can. Get every trace off – a silicone removal tool or a plastic scraper, then a solvent silicone remover for the last film. New silicone will not bond to old silicone residue, and a bead applied over the ghost of the last one lifts at the edges within months and lets water in immediately.

Then dry it. This is the step that gets skipped. The joint needs to be bone dry before the new sealant goes on, which in a bathroom in a Poplar flat with no window means a fan heater or a hairdryer and then twenty-four hours of not using the shower. Wipe the dry joint with isopropyl alcohol before you start, which removes the residual soap film and kills what is sitting on the surface.

Use a sanitary-grade silicone with a fungicide in it. Fill the bath with water before sealing round a bath, and leave it full until the sealant has skinned, so the joint is sized for the loaded position rather than the empty one – a bath drops several millimetres under a person and a rigid new bead will split on the first use.

The bit that decides how long it lasts

Tooling. One pass with a wetted finger or a proper tool, in one direction, without stopping. A bead that has been gone over four times has air trapped in it and a rippled surface with a hundred small ledges for water to sit in, and it will discolour first along exactly those ridges.

How do you stop it coming back?

Manage the drying time, and nothing else on the list matters as much.

Mould needs the surface to stay wet for hours. Cut that window and the colony cannot establish, whatever is on the walls. Which means: run the extractor fan for fifteen to twenty minutes after the shower, not during it alone – most fans wired to the light switch have a run-on timer that has either been disabled or was never set, and it is worth getting an electrician to check yours. Open the window in an Acton bathroom in January even though it is cold, five minutes will do.

Squeegee the screen and the tray. Ten seconds. This single habit removes more standing water from a bathroom than everything else combined.

Leave the shower door open rather than shut. Keep the room warmer, because a bathroom held at 18 degrees condenses far less than one at 12. And on the joint itself, a quick wipe with a dry cloth along the sealant once a week does more than any monthly deep clean.

Heated towel rails on a summer setting are the cheapest mould prevention in the building, and nine times out of ten the flats I work in have theirs switched off from April to October.

Anti-mould paint and the other half-measures

Mould-resistant emulsion on the ceiling helps in a room that already ventilates properly and does very little in one that does not. Same with the silicone: the fungicide in sanitary grade is a delaying additive with a working life of a few years, and it leaches out faster in a bathroom that stays wet. Dehumidifiers work, though a small desiccant unit run for an hour after the shower is a lot of money and noise for something a squeegee and a fan achieve.

The products are a supplement to drying the room. They are not a replacement for it, and any bathroom where the sealant blackens twice in the same year has a ventilation problem wearing a cleaning problem as a disguise.

The last silicone I replaced was in a Brixton shower room where the tenant had been poulticing the same bead every two months for a year and a half. Took forty minutes to cut out. The wall behind it was black to about two inches up, which she had never seen, and which no bleach in the world was ever going to reach.

How to Clean a Front Door and Entrance That Faces a Busy London Street

The front door on a main road gets dirty in a way that the same door two streets back never does, and it gets dirty from a different set of ingredients. A door on a quiet residential turning collects dust and rain marks. A door on Holloway Road collects combustion products, and combustion products are sticky.

That difference decides the whole method. Wipe a greasy film with a dry cloth and you smear it. Wipe it with the wrong chemical and you take the sheen off the paint. I have watched people spend an hour on a door and leave it looking worse in flat daylight than when they started.

What is landing on your front door?

Four main things, and none of them are what most people picture.

Diesel particulate is the first, a fine black carbon that carries an oily fraction, which is why it bonds rather than settles. Brake dust is the second – iron particles thrown off pads at every set of lights, which is why houses near a junction or a pedestrian crossing suffer more than houses mid-block. On Streatham High Road, the properties either side of the crossing lights are visibly worse off than the ones fifty metres up.

Tyre rubber makes the third, a fine dark powder that shows most on white or cream paintwork. And then there is the general urban load: brick dust, pollen in May, and cooking extract if there is a takeaway within three doors.

Mixed together and bound by the oily element, they form what the car trade calls traffic film – a grey-brown layer that is thin, even, and firmly attached. It is the evenness that fools people. Because it covers the door uniformly, there is no obvious dirty patch, so the door reads as merely tired rather than dirty. Wash one panel and stop, and the difference is startling.

Why the film goes greasy rather than dusty

Dry dust falls off in rain. Traffic film does not, because the hydrocarbon content makes it water-repellent, which is why a door that has stood through a week of February rain on Uxbridge Road is no cleaner at the end of it.

The practical upshot: you need a surfactant. Plain water will not lift it, whatever the label on your cloth says. Warm water with a degreasing detergent in it, worked with a soft cloth, is the entire secret and there is no clever product that beats it.

How often does a street-facing entrance need doing?

Monthly for a main road, quarterly for a side street, and there is a real reason for the gap rather than a made-up one.

Traffic film builds in layers and each layer is easier to remove within about four to six weeks. Past that, the oily fraction oxidises and the layer beneath it starts to key into the paint surface, particularly on older gloss where the finish has gone slightly chalky with UV. Two years of unwashed film on a south-facing door in Shepherd’s Bush will not come off with detergent at all – you are into solvent work, or repainting.

So the monthly wash is cheap insurance on a paint job worth several hundred pounds. Fifteen minutes with a bucket, as it goes, and the door outlives the neighbours’ by a decade.

Winter changes the job

Road salt is the winter complication and it lands higher than people expect – spray off passing traffic reaches the bottom third of a door on a road with a 30mph limit, and considerably higher if the pavement is narrow. Salt attacks the bottom rail of a timber door, which is the part most likely to have a hairline crack in the paint, and once salt water is behind the paint film it lifts it.

From November to March, do the bottom eighteen inches of the door and the threshold weekly if you can be bothered. Plain warm water is fine for this – you are diluting and removing salt, not degreasing.

What is the right method for the door itself?

Depends entirely on what the door is made of, and the mistake I see most often is the uPVC method applied to painted timber.

For painted timber, gloss or eggshell: warm water, a squirt of washing-up liquid or a dedicated traffic film remover diluted well past the recommended strength, and a soft microfibre. Work top to bottom in overlapping passes. Rinse with clean water immediately – detergent left to dry on gloss leaves a bloom. Dry with a second cloth rather than leaving it to air, because London water spots.

For uPVC, the same wash, then a resin-based uPVC restorer on the frame if it has gone chalky. Yellowing on white uPVC on a sun-exposed elevation is oxidation, and cleaning does nothing for it. There are cream restorers that work reasonably and a lot that do not.

Composite doors need care. The surface is a printed foil or a moulded skin, and abrasive pads take the grain texture off in patches you cannot repair. Soft cloth only, no cream cleaner, no magic eraser. A melamine sponge on a composite door is a permanent dull spot.

Glass panels last, after the frame, so you are not chasing drips.

Door furniture is its own job

Unlacquered brass on a Georgian door wants a metal polish and a soft cloth, and it will need doing every three or four weeks on a busy road because sulphur compounds in traffic exhaust tarnish brass fast. Lacquered brass wants nothing but soapy water – polish strips the lacquer and then you have committed yourself to polishing it forever, which is a decision people make by accident all the time.

Chrome and satin nickel: soapy water and a dry buff. Antique iron: a wipe and an occasional oil, never a wax that will come off on hands.

The letterplate is the filthiest single component on any London front door. The inside face of the flap collects everything, and nobody has ever cleaned it. Open it, wipe both faces, do the hinge.

How do you handle the step, path and threshold?

Carefully, if the step is anything older than about 1960.

Victorian and Edwardian entrances across most of inner London have encaustic tiled paths – the geometric red and buff tiles you see in Camberwell and along half the terraces in Leytonstone. They are unglazed, they are porous, and they are worth restoring rather than replacing at anything from £200 a square metre. They also break easily, and the grout between them is soft lime mortar in the original installations.

Warm water, a stiff brush that is not wire, and a pH-neutral tile cleaner. Acidic cleaners eat the mortar. Bleach lightens the buff tiles unevenly and the patchiness never quite goes.

York stone and limestone steps: same principle, neutral cleaner, no acid. Concrete steps you can be rougher with.

Algae and the green film that grows on a north-facing step want a proprietary biocidal wash left to dwell rather than scrubbing, because scrubbing removes the visible growth and leaves the spores.

The pressure washer question

Do not, on any period entrance. This is where I lose arguments with clients and I have not changed my position in years.

A pressure washer on Victorian path tiles blows out lime mortar joints, drives water under the tiles, and lifts the surface off any tile that has already started to spall. On stone it opens the surface and makes it dirty faster afterwards. On painted timber it forces water behind the paint film. I have seen a beautiful tiled path off a road in Tooting turned into a jigsaw by a hired machine and a confident afternoon.

Modern concrete or block paving, fine, go ahead. Anything else, a brush and a bucket, as it goes.

What ruins an entrance faster than the traffic does?

The cleaning, most of the time.

The list of things I have been called out to repair: a bleached patch on a York stone step where somebody poured neat thin bleach to kill algae; a composite door with a dull rectangle from a melamine sponge; a brass knocker in Woolwich stripped of lacquer with Brasso and left to go green within a fortnight; scoured gloss paint where a scouring pad went at a stubborn mark. Each of those was a fifteen-minute job that turned into a repaint or a replacement.

The porch and the bit nobody looks up at

Recessed entrances collect what the street throws and then hold onto it, because there is no rain reaching the back corners to wash anything through. Cobwebs in the head of the arch, a drift of leaf litter and cigarette ends in the corner behind the door, and on any porch within reach of a parapet or a ledge, pigeon mess that has been there long enough to bleach the stone underneath it.

Do the ceiling of the porch first with a soft broom, then the walls, then the floor, and expect to do the floor twice. Pigeon droppings want softening with warm water and lifting rather than scraping, and gloves on for that one, as it goes – dried droppings are a real respiratory risk when they turn to dust.

Communal entrances to converted flats are worse again, because responsibility is diffuse and the managing agent’s contractor does the hallway and stops at the threshold.

Rule of thumb worth holding: use the mildest thing that works, and give it dwell time instead of pressure. Rinse everything afterwards.

And the part that costs me money to say – a street-facing front door on a monthly cycle is a homeowner job, not a contractor job. Fifteen minutes, a bucket of warm soapy water, two cloths. Paying somebody to come out for that alone is poor value, and if a firm quotes you for a monthly door wash they are selling you a call-out charge. Book the professionals for the path restoration and the render or brickwork above the door – the jobs with machinery and consequences behind them.

My own front door faces a bus stop. I do it on the first Sunday of the month with the same red bucket, and the letterplate flap still gets forgotten about half the time.

How To Make Your Flat Ready For Professional Photos Before Letting or Selling – The Ultimate Cleaning Guide

A camera is a worse eye than yours in every respect but one. It cannot smell the flat. It cannot feel that the worktop is tacky. What it does, better than any person standing in the room, is record light – and everything a flat does wrong with light shows up in a photograph long before it registers on a viewer walking through the door.

That is the whole of the job, and most people preparing a flat for the agent’s photographer get it backwards. They hoover, they wipe, they put the bins out, and they leave the two things the lens will punish them for.

What does the camera see that you don’t?

Film, dust in the wrong plane, and the state of the glass.

Wide-angle lenses are used for property work, which means the photographer stands in the corner of a Balham living room and captures floor, ceiling and both side walls in one frame. Your eye edits. It looks at the sofa and ignores the six inches of skirting behind it. The camera weights everything the same, and a grey line of dust along a white skirting board reads on screen as a shadow, which reads as dirt, which reads as a flat nobody has looked after.

Second thing: reflections carry detail. Anything shiny in the room becomes a small mirror pointed back at the mess. Glass cabinet fronts, the black screen of a switched-off television, the hob, a mirrored splashback. On a bright day in a south-facing flat in Kentish Town, a fingerprinted stainless fridge door will reflect the window and every smear across it turns into a visible white streak.

Dust is a light problem, not a hygiene problem

Household dust sits mostly on the horizontal – shelf tops, the crown of a radiator, picture rails, the top edge of a door frame. From standing height you see none of it. From a lens set at chest height with the ceiling in shot, the top of that door frame is a bright line running across the picture, and if there is a fortnight of dust sitting on it, the line turns dull grey.

For my money, half an hour with a damp microfibre on high horizontals does more for a photoset than a full day on the floors.

Which surfaces pay you back the most?

Glass first, and by a distance.

Windows are where the light comes in, so any film on them costs you brightness across the entire image. Interior glass wants doing on both faces, with a proper method – a solution and a squeegee, dried at the edges with a cloth, rather than a spray-and-buff that leaves a haze visible only when backlit. The haze is invisible when you stand in the room facing inwards. Turn around, face the window, and there it is.

Exterior faces matter more in flats than in houses because the grime is different. A first-floor flat on a bus route through Tufnell Park carries brake dust and diesel film on the outside pane, and it produces a flat, milky quality across every window-facing shot that no amount of editing quite corrects. Sash windows painted shut thirty years ago are the worst offenders, and you will need a reach pole or a window cleaner rather than a chair and optimism.

After glass: the bathroom. Chrome, mirror, screen. Three surfaces, and the screen is most of the work. A shower screen with hard-water scale photographs as a grey fog and there is no angle that hides it. London water being what it is, the screen wants an acid treatment – a proper limescale remover left the full dwell time, then a blade at a shallow angle for the bonded deposits and a dry buff after. Mirrors after, never before, because the acid work throws spray.

Then the kitchen: hob, splashback, tap, the front faces of the units. Handleless matt doors show every touch mark, and in a photograph the marks cluster exactly where you would expect – a fan of fingerprints around the dishwasher edge.

The things people over-clean

Inside the oven. Inside the wardrobes. Behind the fridge. Under the bed. None of it appears in a single frame, and I have watched sellers spend a Saturday on an oven interior while the window in the main bedroom stayed filthy.

If you are selling and the flat is empty, clean the oven anyway – a buyer will open it at the viewing. If the photos come first and the viewings are three weeks out, do the oven in week three.

When should the clean happen?

The day before. Not the week before, which is when most agents advise it, and not the morning of, which is when the flat smells of chemicals and the floors are still damp.

A flat that has been deep-cleaned seven days before the photographer arrives is a flat with seven days of dust back on the high horizontals and a fresh set of prints on the fridge door. The visible payback from a professional clean decays fast in an occupied home. In an empty one it holds for a couple of weeks, so timing is looser, though empty flats accumulate a fine gritty dust from the communal parts that settles on skirtings within days.

Order of operations matters more than most people think. Top down, dry work before wet work, floors last, glass at the very end. Hoovering after you have cleaned the windows means grit gets kicked into the air and settles on the pane. Doing the mirrors before the shower screen means doing the mirrors twice.

Leave the flat aired for an hour before the shoot. Photographers work fast, and they turn lights on, which means a warm bulb over a still-damp worktop makes a visible bloom.

The half-day version

If you have limited time or budget, the order I would spend it in: window glass inside, shower screen and bathroom chrome, high horizontals and skirtings in the two rooms that will lead the listing, kitchen fronts and hob, floors. Stop there. Everything past that point is for the viewings, not the photographs.

For my money, four hours spent in that order beats eight hours spread evenly across the flat.

Does anything outside the front door matter?

More than agents admit, because the listing carries an exterior shot and a hallway shot whether you like it or not.

Communal areas are the weak point of every London flat sale. A tidy two-bed in a Whetstone block loses ground the moment the first photo shows a communal stairwell with a stack of unclaimed Amazon boxes and a carpet that was last replaced under a different managing agent. You cannot clean the whole building. You can move your own bikes, break down the boxes, sweep the landing outside your door and wipe the inside of the communal entrance glass, which is usually filthy and which nobody has ever been contracted to touch.

Your own front door photographs harder than you expect. Fingerprints round the handle, cobwebs in the top corner of the frame, a dusty threshold strip. Two minutes.

For ground-floor and garden flats, the outside space carries real weight in a listing. Sweep the patio, pull the weeds out of the paving joints, and hose the algae film off the decking. Green film on decking or a York stone path in a Hanwell garden flat photographs as a stain and drops the whole shot.

Bin stores and what the camera catches by accident

Wide lenses catch what you did not intend. The corner of a bin store visible through a kitchen window. A drying rack reflected in a bedroom mirror. A cable coil under the desk that reads as clutter at thumbnail size. Walk the flat holding your phone at chest height, take a picture from each corner of each room, and look at what turns up. It is a five-minute exercise and it catches things standing in the room never will.

What can you leave alone?

Carpet shampooing, in most cases. This is the one I get argued with about.

A mid-tone carpet that has been hoovered thoroughly with a good machine photographs almost identically to a carpet that has been extraction-cleaned, because the camera cannot resolve fibre-level soiling under a wide-angle lens at listing resolution. What it does resolve is a matted traffic lane and any dark stain over about the size of a saucer. So spot-treat, hoover in one direction so the pile lies uniform, and put the shampooing money into the windows.

That advice loses me carpet work, and I give it every time somebody asks. The exception is odour, which the camera misses and every viewer notices within four seconds of the door opening – if a flat in Deptford smells of dog or old cooking oil, the extraction clean earns its fee at the viewing stage, and it should be booked for then rather than for photo day.

Also leave: the loft hatch, the inside of the kitchen cupboards, the airing cupboard, and the radiator fins. Radiator fins are the great false economy of pre-sale cleaning – forty minutes with a brush and a hairdryer for something that appears in no photograph and that no viewer has ever crouched down to inspect.

What the money is really buying

A pre-photo clean buys two things: brightness, and the absence of anything that reads as neglect at thumbnail size. Most listings are first seen on a phone at about four centimetres wide, where a smeared window costs you a click and a dusty skirting is invisible. The order I work in follows that fact, which is why I will spend ninety minutes on glass in a flat where the oven has not been opened.

Agents rarely say this because the deep-clean upsell is easier to explain. For my money, a listing photographer and a window cleaner between them will do more for an asking price than any amount of work on surfaces the lens never reaches.

The last flat I did before an agent’s shoot was a one-bed in Mill Hill East. Ninety minutes on the windows, forty on the bathroom, thirty on high dust, and the floors got a hoover and a damp mop. Photographer arrived at ten, worked for thirty-five minutes, and the only thing he asked me to move was a bathmat.

Insured or Uninsured Cleaners: What London Homeowners Should Check

Ask a cleaner whether they are insured and you will get a yes. You will get a yes from the good ones, the mediocre ones, and the man who does four flats in Stanmore on a Tuesday with a hoover in the back of a Corsa and no policy whatsoever, because the question is so routine that a truthful answer has stopped occurring to anybody.

The word is close to meaningless on its own. What matters is which cover, at what limit, with what excluded, and whether the thing most likely to go wrong in your house sits inside the policy or outside it. In my experience, it usually sits outside it.

Is a cleaner even required to carry insurance?

No, and this catches people out.

Public liability insurance is not a statutory requirement for a self-employed cleaner in the UK. A sole trader can trade for a decade, clean two hundred London homes, and never buy a policy without breaking any law. It is not a legal requirement for most businesses, unlike employers’ liability, which is legally required once you have employees. So when a cleaner tells you they are fully legal, that statement and the insurance question are answering different things.

Employers’ liability is the one with teeth. The moment a cleaning business takes on anyone – including seasonal staff and subcontractors – employers’ liability becomes a legal requirement, and non-compliance carries a fine of up to around £2,500 per day. That matters to you if you are booking through an agency, because the person standing in your hallway may be an employee of the agency or a self-employed cleaner it merely introduced, and each has a different insurance position. Agencies are rarely eager to clarify which.

The introduction agency dodge

A large slice of the London domestic market runs on introduction. The company takes a fee, matches you with a cleaner, and the contract for the cleaning work sits between you and that individual. The agency’s own insurance covers the agency’s business – its office, its staff, its liability as an introducer. It may not extend to the person cleaning your bathroom.

Ask the question directly: is my cleaner your employee, or are you introducing me to a self-employed person? Then ask who holds the policy that would pay if she puts a hot iron through the runner in the hall. Mind you, the answer arriving slowly is itself an answer.

What does public liability pay for?

Injury to a third party, and damage to your property caused by the cleaner’s work. A ladder through a window at a house in Winchmore Hill, a slip on a wet floor by the postman, a bottle of something caustic knocked into the fabric of a sofa. Standard limits run from £1m up to £5m, and for domestic work in a flat, £1m is plenty – you are unlikely to generate a seven-figure claim with a mop.

Here is the part almost nobody checks. Most standard policies exclude damage to the thing being worked on.

Treatment risk covers damage caused by cleaning solutions or chemicals during the job – bleach discolouring a carpet, a product damaging a surface – and most standard liability policies exclude it, which leaves the cleaner personally liable for the cost. Specialist cleaning policies add it back in alongside damage to property worked on, key loss and employee dishonesty.

Sit with that for a second. The overwhelming majority of domestic cleaning accidents are damage to the surface being cleaned. Someone uses an acidic descaler on a honed limestone worktop in a Fulham kitchen and etches it dull. Someone puts a cream cleaner on a brushed brass tap and takes the lacquer off. Someone leaves a bleach-based product sitting on a coloured grout line in Petts Wood for twenty minutes. Every one of those is a treatment risk claim, and under a bog-standard policy every one of them is refused.

So the certificate your cleaner emailed over is, in the most common failure scenario, decorative. That is my strong view and I am comfortable with how unpopular it makes me among people who sell certificates.

What to read on the schedule

Skip the headline limit. Go to the endorsements and the exclusions and look for two specific phrases: treatment risk, and damage to property in your care, custody or control. Any policy carrying both has been bought by someone who read it. A policy carrying neither was bought at four in the morning for £6 a month to satisfy a client who was never going to check.

Check the excess too. Budget policies that do include treatment risks often carry an excess around £500. If your cleaner would have to find £500 before the insurer pays a penny, small claims will never be made, whatever the paperwork says.

Does the certificate on its own prove anything?

It proves a policy existed on the date printed.

I have been sent screenshots of certificates that expired in 2023. I have seen a certificate for a limited company whose cleaner had left that company eight months earlier and gone independent. I have seen one that covered domestic cleaning only, held by a firm doing end-of-tenancy work with steam machines and industrial degreasers, which is a different trade with a different risk profile and would very likely be a declined claim.

Three things make a certificate useful, and you can check all of them from your phone while the kettle boils. The name on it has to match the person or company invoicing you. The dates have to include today. And the description of business has to match the work being done in your house – policies are rated on the activity described, so a cleaner who describes themselves as domestic only and then takes on commercial or specialist work has a gap.

If you want to be thorough, ring the insurer or the broker named on the document and ask whether the policy number is live. Takes four minutes. Almost nobody does it, which is precisely why the expired-certificate trick keeps working across half of Greater London.

Keys, alarms and the cover people forget

Key cover is not automatically part of public liability – if a cleaner holds your keys, key loss and the associated locksmith and call-out costs need checking specifically. On a flat with a communal fob, a shared entrance and a Banham lock, a lost keyset is not a £15 problem. It is a locksmith, a new cylinder, and possibly a re-fobbing charge from the managing agent that lands at several hundred pounds.

I hold keys for eleven households between Carshalton and Sutton and I pay extra for that cover every year. Mind you, I lost a set exactly once, in 2019, down the side of a car seat, and the client found out because I told her before I found them.

What happens when something gets broken?

The insurance question and the honesty question are separate, and the second one predicts the outcome better.

Most domestic breakages are small. A glass, or a chip out of a mirrored cabinet door in a Bermondsey bathroom. These sit below any sensible policy excess, which means the insurer is irrelevant and the only thing that determines whether you are made whole is whether the cleaner tells you and offers to sort it. A cleaner who leaves the pieces in the bin and says nothing has told you everything you need to know about how the £2,000 claim would go.

For the larger events – water damage from a machine left running, a fall on your stairs – insurance is the whole ballgame. Water is the one to watch in flats. A cleaner who runs a washing machine or a dishwasher and leaves before the cycle ends is exposing you to a leak claim against your downstairs neighbour, and the sums in a converted terrace in Ealing get large fast once you are into other people’s ceilings.

The advice that costs me work

If a cleaner damages something in your home and the value is under a few hundred pounds, your own home contents policy with accidental damage cover will settle it faster and with less friction than pursuing the cleaner’s insurer, and in many cases your insurer will pay and not bother recovering it.

That advice is against my interests to give, because it makes my insurance status less of a selling point than the bloke down the road who has none. I would rather you knew.

How should you handle this at the booking stage?

Ask before the first visit, not after the first breakage. Request the certificate as a document rather than a claim, check the name and dates, and read for the three exclusion phrases. Ask whether the cleaner is employed or self-employed. Ask what happened the last time they broke something, which is a better question than any of the others, and watch how quickly the answer comes.

A cleaner who has been working London homes for a decade has broken things. Anyone claiming otherwise is either new or lying, and I would rather hear about the chipped Belfast sink in Orpington than a spotless record.

Price and cover move together

Cover costs money and the money comes out of the hourly rate. Basic public liability for a cleaner starts at around £5 to £6 a month, with the figure rising once accidental damage, tools and specialist work get added, and a properly endorsed policy with treatment risk and key cover on top lands closer to a few hundred pounds a year. Spread across a round of thirty households, that is small. Spread across a cleaner doing six houses a week cash-in-hand, it is a meaningful chunk of a week’s takings, which is why the cheapest quote in your inbox is often the uninsured one.

Mind you, I have met superb uninsured cleaners and insured ones I would not let past the door. The paperwork tells you about risk transfer. It tells you nothing about whether the skirting boards get done.

Mine is a wine glass in a Winchmore Hill kitchen, September, stem snapped in the drying rack. Cost me £11 to replace and I never mentioned the insurance once.

How Often Should You Book a Domestic Cleaner For a One-bedroom London Flat?

The one-bedroom flat is the job most people book wrong. The flat looks small, so the assumption that follows is that small means occasional. Then three months in they are quietly annoyed that the shower screen has gone milky and the extractor hood feels tacky under the fingers, and they cannot work out why, because someone has been coming.

I have cleaned one-beds across the whole of Greater London for years now – Ruislip Manor, then a run of ex-council maisonettes off Green Lanes in Harringay – and the frequency question has a better answer than the one most agencies give by reflex.

What does a one-bedroom flat produce in a week?

Roughly the same soil load as a two-bed, minus one room of floor. That surprises people. Bedrooms are the lowest-maintenance rooms in any home. They shed skin cells and dust, they need a hoover and a bed change, and that is near enough the whole of it. The work in a flat lives in the kitchen and the bathroom, and a one-bed has exactly one of each, same as a three-bed in Muswell Hill.

So the question is not really about the flat’s size. It is about how the flat gets used.

A solo occupant in a Nine Elms new-build who eats out four nights a week and showers at the gym generates very little. Maybe a bin and some hair in the shower trap. Compare that with a couple sharing a 520-square-foot Victorian conversion in Forest Hill, both working from home, cooking properly every night with a gas hob and no decent extraction. Same floor area on paper. Three times the work in practice, and I would price it accordingly.

The occupancy multiplier nobody mentions

Two people in a one-bed do not create twice the mess of one – they create closer to three times it, because the flat has no slack in it. One kitchen worktop, one draining board, one bathroom sink. Everything gets used harder and nothing gets a rest day. A shared bathroom in a one-bed with a single basin and a bath-shower combination is the most punished square metre in London housing stock. I have seen limescale bloom on a chrome mixer tap in eleven days flat in a first-floor conversion near Colliers Wood.

Where there is a washing machine in the kitchen rather than a utility space, add drying laundry, add a permanently damp airer in the living room, add the humidity that pushes mould into the silicone.

Why is fortnightly the wrong default for most one-beds?

Because it is the schedule that satisfies nobody, and it is the one almost every agency sells first.

Here is what happens over fourteen days in a hard-water London flat. Limescale on the shower screen stops being a film and becomes a deposit, which means it now needs an acid and a blade rather than a squeegee and two minutes. Grease behind the hob passes from wipeable to scrubbable. The bathroom silicone starts to spot. So the cleaner arrives to a flat that needs remedial work, spends the visit doing recovery rather than maintenance, and never gets to the things that make a home feel properly clean – the skirting boards and the inside of the microwave.

You pay for three hours and you receive two hours of catching up and one hour of actual cleaning.

Weekly at two hours beats fortnightly at three hours in a one-bed, every time, and it usually costs less across the month. That is my contestable opinion and I will hold it against anyone who wants to argue: fortnightly is the worst frequency on the board for a one-bedroom flat. Either commit to weekly and let the cleaner maintain rather than rescue, or drop to a proper monthly deep clean and handle the surface stuff yourself between visits. The middle option is where money goes to die.

When fortnightly does earn its keep

There is one profile it suits. Single occupant, softened water or a filtered shower, a flat with a real extractor fan that runs on a timer, someone who wipes the hob after cooking and squeegees the screen after showering. That person is doing the maintenance layer themselves and paying for the depth layer. Fortnightly is exactly right for them, and I have three such clients in Eastcote who have been on that schedule for years without a single complaint about drift.

Most people are not that person. Most people are tired.

How much does the flat itself change the answer?

More than the postcode does, though the postcode matters too and I will get to it.

Surfaces set the schedule. Matt handleless kitchen doors in a dark colour – the sort fitted in every Peckham development between 2016 and 2021 – show every fingerprint and every splash of oil, and they need attention weekly or they look neglected. Gloss white shows less. Brushed brass taps, which have become the standard specification in refurbished flats across Islington and Hackney, water-spot within a day and go dull within a fortnight if nobody dries them.

Flooring is the other lever. Engineered oak through an open-plan living space needs a damp mop rather than a wet one, and it needs it often, because grit tracked in from the street is what scratches a lacquer finish. Carpet in the bedroom is more forgiving. LVT is the most forgiving thing in the building and I wish more landlords fitted it.

Window position matters more than clients expect. A ground-floor flat on a bus route – anywhere along the A21 through Bromley, say, or the Seven Sisters Road – takes brake dust and diesel particulate through the trickle vents and lays a grey film on every horizontal surface. Same flat on the third floor at the back of the building stays clean near enough twice as long.

The bathroom sets the clock

If you want one rule to schedule by, use the bathroom. Whatever interval keeps your shower screen clear without a chemical intervention is your correct cleaning frequency. Everything else in a one-bed can stretch. The bathroom cannot, because London water runs between 250 and 350 parts per million of calcium carbonate across most of the supply area, and once scale bonds to glass it stops being cleaning and starts being restoration.

Bexley and parts of the far south-east sit slightly softer. Not soft. Slightly softer.

What I would add for anyone renting: the shower screen is also the thing your letting agent photographs at check-out. Scale etched into toughened glass does not come off, and I have watched two tenants in the same Sydenham block lose deposit money over it. A cleaner visiting weekly protects that glass. A cleaner visiting when you remember to call one does not.

Does where you live in London change how often you need someone?

Yes, and in two ways that pull against each other.

The physical way is water hardness and building age. Thames Water’s supply across north, west and central London is chalk-fed and properly hard, so a flat in Kensal Rise scales faster than an equivalent flat served by softer supply further out. Older stock leaks dust – a converted Victorian terrace in Walthamstow with original floorboards and lath-and-plaster ceilings will produce fine grey dust into a room forever, and no amount of cleaning stops it at source.

The commercial way is minimum visit length. Cleaners in outer London – Upminster, Chessington, Enfield Highway, take your pick – travel further between jobs, so the minimum booking tends to be three hours rather than two. That pushes people towards booking less often, which is the opposite of what their flat needs. If you are on the edge of the Greater London boundary, look for someone who lives locally rather than an agency dispatching from a central office, and you will get the shorter, more frequent visit that suits a one-bed.

Access is a scheduling decision

Third-floor walk-up with no lift, a communal door on a fob, and a fifty-minute round trip from the cleaner’s last job – that flat will not get a reliable weekly slot at a good rate. Key-holding fixes half of it. A key safe in the communal cupboard fixes most of the rest.

What does frequency do to the price?

Regular work is worth more to a cleaner than one-off work, so it should cost you less per hour. Across Greater London in 2026, independent domestic cleaners sit somewhere around £18 to £25 an hour, with agencies landing a few pounds above that once their margin goes on. A committed weekly slot at a fixed time is the thing that earns a discount, because it lets the cleaner build a round without dead travel.

One-off and monthly deep cleans price higher per hour, and they should. Different work, different chemicals, more time on hands and knees.

The rate is also the wrong number to fixate on. Two hours a week at £22 costs you £176 a month and the flat stays at a standard you stop thinking about. Three hours a fortnight at £20 costs £120 and the flat sits at about seventy per cent, near enough permanently, with the shortfall concentrated in the two rooms visitors use. I know which of those I would rather pay for, and I say that as the person who invoices either way.

Why the first visit runs long

Whatever schedule you settle on, book the first visit at double the ongoing length. The flat has history in it – the previous tenant’s grease behind the cooker, dust sat on the curtain rail since before you moved in. Maintenance cleaning only works from a clean baseline, and if you skip establishing that baseline you spend the next six months paying weekly rates for a flat that never quite gets there.

I did a one-bed in Thamesmead last spring where the ongoing was two hours and the first visit ran five and a half. Third visit onwards, we were down to ninety minutes and finishing early, which is where a well-run one-bed ought to land.

That flat still has a stain on the hall carpet from a knocked-over bottle of red. It came out to about eighty per cent. Some things stay.

How to Make the Switch from Local-Area to City-Wide Cleaning Coverage

When you first start a cleaning business, it’s natural to focus on a small area—your local neighbourhood or borough—where you can develop your skills, build a loyal customer base, and refine your services. But after a few years of steady growth, you might begin to feel like your business has plateaued. If you’re wondering whether it’s time to expand, the answer might be a resounding yes. Making the leap from local-area to city-wide cleaning coverage can be a game-changer for your business.

The move opens up opportunities for larger contracts, more clients, and the ability to scale your operations in a way that keeps you ahead of the competition. However, it’s not without its challenges. Expanding means adjusting to new dynamics, embracing a broader client base, and dealing with the complexities of serving a much wider area.

In this article, we’ll discuss the key steps in making that transition. From understanding the pros and cons of city-wide coverage, to recognising when you’re ready to take the plunge, to exploring what you need to consider in terms of staffing, logistics, and competition, we’ve got you covered. Ready to take your cleaning business to the next level?

The Pros and Cons of Going City-Wide

Before jumping headfirst into expanding your cleaning business, it’s important to understand both the benefits and the drawbacks of going city-wide. The vastness of London, with its bustling neighbourhoods and busy streets, offers a mix of opportunity and complexity that you need to weigh carefully.

Pros of Expanding to a City-Wide Area

  1. Access to a Larger Client Base Expanding beyond your local area means that you’re no longer restricted to just one neighbourhood. Whether you’ve been working in SW16 or SE8, London’s 32 boroughs offer a seemingly endless stream of potential clients. In areas like W1 or EC1, businesses and residential buildings are often looking for top-tier cleaning services, giving you the chance to cater to both commercial and residential markets.
  2. More Opportunities for Bigger Contracts By offering services across the city, you can tap into larger contracts that wouldn’t be possible in a smaller local area. Commercial offices in Canary Wharf or hotels in the West End can be lucrative long-term clients. The demand for cleaning services in such areas is constant, and you could find yourself securing larger, higher-value contracts with companies that require consistent and reliable cleaning.
  3. Increased Brand Visibility As you extend your coverage across London, you’ll increase your brand’s visibility. The more areas you service, the more people will hear about you. With some clever marketing and online presence, you can solidify your position as a trusted and reliable service provider in multiple boroughs.

Cons of Expanding to a City-Wide Area

  1. Higher Operational Costs A city-wide cleaning service comes with increased costs, particularly in terms of travel and logistics. You’ll need to consider fuel, transport, and perhaps even a central office or storage facility for equipment. For example, commuting from SE London to the West End every day can become costly and time-consuming.
  2. More Competition The larger the area you serve, the more competitors you’re likely to encounter. In a city as big as London, you’ll face stiff competition from other cleaning businesses that also serve a city-wide area. Larger companies with more resources might start to notice your rise, and you’ll need to adapt to compete with them.
  3. Logistical Challenges Managing cleaning schedules across a vast city means dealing with complex logistics. For example, coordinating a team of cleaners to service different areas, like W2, E1, and N1, could result in inefficiencies or missed appointments if you don’t have a robust system in place.

How to Recognise the Signs You’re Ready to Make the Next Step

Making the leap from local-area to city-wide cleaning coverage is a big decision. Here are a few signs that you’re ready to make the transition:

1. Your Client Base is Growing

If your current client base is expanding beyond your local area and you’re constantly getting referrals from different boroughs, it’s a clear sign that your services are in demand. For instance, if you started in areas like SE18 and now have clients asking for services in W12 or NW1, it shows that you’re ready to spread your wings.

2. You’ve Streamlined Your Operations

Before you can expand, your business must be running like a well-oiled machine. This means having efficient processes for invoicing, scheduling, and customer communication. If your current operation is running smoothly in a local area, it will be easier to scale up to a larger area without getting overwhelmed.

3. Your Reputation is Strong

If you’ve built a solid reputation in your local area and have regular, loyal clients who trust your work, you’re in a strong position to move city-wide. A well-established reputation can be your best marketing tool when venturing into new areas.

4. You Have the Resources to Scale

Expansion requires financial backing and support. If you’re confident that you have the resources to manage increased costs—whether it’s for extra staff, equipment, or transport—then you’re in a good place to grow your coverage.

You’ll Be as Big as Your Planning Permits

Expanding your cleaning service beyond a local area isn’t just about the size of your ambition—it’s about how well you plan your expansion. If you aim to cover all of London, but your systems aren’t set up to handle this growth, you’ll quickly find yourself overwhelmed. Here’s how to plan for success:

1. Invest in Technology and Systems

Technology plays a huge role in streamlining city-wide operations. Tools like scheduling software, customer management systems, and GPS route optimisation can make your job easier. This is especially important for a busy city like London, where you’ll be managing multiple teams across different boroughs.

2. Scalable Marketing and Branding

You’ll need to market your services in a way that resonates with clients across the city. A local marketing approach won’t work in areas like W4, W10, and EC2. You need a city-wide strategy that showcases your business’s ability to meet the unique needs of each area. Make sure your branding reflects a service that can be trusted across multiple boroughs.

3. Financial Planning

The financial aspect of expanding a cleaning business to cover a city requires foresight. Budgeting for extra staff, additional transportation, and the potential for slow growth in new areas is essential. You must ensure your cash flow can support the upfront costs of expansion.

Factors You Cannot Overlook

Moving to a city-wide service means considering some essential factors that you might not have needed to worry about in a local-area setup. Here’s a breakdown of what you need to factor in:

1. More Cleaners to Work With

A city-wide cleaning service requires a larger team. Managing multiple cleaners and teams across different locations—whether it’s in the City of London or Greenwich—requires better staff coordination. You’ll need to recruit reliable staff, provide ongoing training, and ensure that they understand the expectations for each area.

2. Travel and Transport Arrangements

As you expand, you’ll be covering longer distances. In London, this means dealing with high traffic, expensive parking, and navigating busy streets like Oxford Street and King’s Road. Planning your travel routes and having reliable transport will be crucial to ensure your teams are on time.

3. Knowing Each Area

Expanding your cleaning coverage means learning about different areas of the city. Each borough in London has its own set of challenges, whether it’s the type of buildings (e.g., large commercial buildings in Canary Wharf, or residential flats in Chelsea), the local rules and regulations, or even traffic patterns. You’ll need to research and understand each area to avoid delays or costly mistakes.

4. Challenges in Scheduling

Coordinating schedules across a larger area can be tricky. Consider how to avoid time wasted by sending a cleaner from SW11 to NW5, only to have them return to a nearby location immediately after. The right scheduling software and a clear communication system will be essential in managing these complexities.

Wrestling with the Big Boys

The London cleaning competition is fierce. Once you expand to city-wide coverage, you’ll be going head-to-head with much larger cleaning companies, some of which might have more resources at their disposal. So how can you stay competitive?

1. Find Your Niche

Rather than trying to beat the big companies at their own game, focus on what makes you unique. Maybe it’s your attention to detail, customer service, or your specialised services (like post-event cleaning at O2 Arena or restaurant cleaning in Shoreditch). Emphasise your personal touch and reputation for quality.

2. Quality Over Quantity

Many of the larger cleaning companies prioritise volume over quality, so take advantage of this by offering superior services. Word-of-mouth recommendations are invaluable in London’s tight-knit communities, so delivering exceptional results will earn you loyal customers.

3. Build Relationships

Networking is key in London. Relationships matter in the cleaning business, whether it’s with clients or suppliers. By cultivating long-term partnerships and offering competitive pricing, you can maintain an edge over your competitors.

A Handy Guide To Cleaning Up After Renovations

Renovating your home can be exciting, turning those tired spaces into something fresh and vibrant. But let’s be honest—the aftermath often feels like facing a mountain of dust, debris, and leftover construction chaos.

This guide will help you tackle the post-renovation cleanup like a pro. You’ll want to start by gathering the necessary supplies and crafting a solid action plan. Don’t worry; you’ll quickly learn to clean specific surfaces like wood and tile.

With some handy tips on deep cleaning and keeping your space looking sharp, you’ll be all set to kick back and enjoy your newly renovated home before you know it.

Preparing for Post-Renovation Cleanup

Preparing for Post-Renovation Cleanup

Once you’ve wrapped up your renovation project, the next big task is preparing for the post-renovation clean-up to restore your living space to its former glory. It might feel daunting, but you can tackle the mess efficiently with a solid plan.

First, gather the right tools and cleaning supplies—your secret weapon for a successful clean-up. Focus on thorough dust removal, removing debris, and improving air quality. And don’t forget about safety! Wearing protective gear will help you turn your space back into a clean haven in no time.

Gathering Essential Supplies

Gathering essential supplies is key to managing your post-renovation cleanup effectively. You’ll want to grab cleaning products and the right tools, such as mops, brooms, buckets, and rubbish removal items, such as refuse sacks, to handle all that debris. Having everything ready will help streamline the process, allowing you to tackle that renovation mess without unnecessary delays.

Consider opting for eco-friendly cleaning supplies; they’re better for the environment and safer for your family and pets. Look for biodegradable detergents, vinegar, and bicarbonate of soda. These can tackle tough stains and odours while keeping harmful chemicals at bay. Organising these items into a designated cleaning caddy can make it easy to access everything during your cleanup sessions.

Start at the top of each room for surface cleaning and work your way down to avoid just moving dust around. Don’t forget to use microfiber cloths—they’re great for effective dust removal and ensure your surfaces stay hygienic. This way, you’ll maintain a clean and inviting space once all that renovation dust finally settles.

Creating a Plan of Action

Creating a plan of action is key to a smooth post-renovation cleanup, allowing you to tackle each task systematically. Outlining a cleaning strategy that focuses on areas needing immediate attention—like high-traffic zones and surfaces—can ensure everything gets done efficiently. A checklist can be a lifesaver here, helping you keep track of what needs to be cleaned, from dusting and vacuuming to sanitising and eliminating odours.

To simplify things, consider breaking down the cleaning process room by room and assigning specific tasks for each area. For example, in the kitchen, you’ll want to focus on surfaces like worktops and appliances, while in the sitting room, prioritise dusting shelves and vacuuming upholstery.

Time-saving techniques, like microfibre cloths for dusting, can reduce your time on each task. And don’t forget about deep cleaning recommendations for carpets and upholstery at least once every season; these chores might take longer but will pay off with a fresher home environment.

By implementing these strategies, you can create an efficient cleaning routine that leaves your spaces spotless and inviting.

Cleaning Up Construction Debris

Clearing up construction debris after renovations is essential if you want to restore your home, and it can feel quite overwhelming if you don’t tackle it the right way.

Start by creating a solid debris and dust removal plan, focusing on the areas where construction materials have accumulated. Proper disposal methods are essential; choose eco-friendly options to keep your environmental footprint in check.

Furthermore, specialised cleaning techniques will help you deal with even the most stubborn renovation messes effectively.

Removing Dust and Debris

Removing dust and debris is essential after your renovation, as those pesky remnants can interfere with your home’s appearance and air quality. Start using effective cleaning techniques, such as vacuuming with a HEPA filter. This will help you trap those fine dust particles and thoroughly cover all surfaces. For the larger bits of debris, grab a broom and dustpan for a quick cleanup before you dive into the nitty-gritty.

Once that’s done, follow up with a damp microfiber cloth to wipe down surfaces. This way, you’ll capture the dust instead of just moving it around like a game of tag. If you encounter stubborn residues, a gentle multi-surface cleaner can be your best friend; it’ll tackle the grime without causing any damage.

Remember those hard-to-reach spots, like ceiling fans and skirting boards. A small extension attachment for your vacuum can work wonders here. Keeping your home dust-free is all about regular maintenance. Establishing a cleaning schedule, using air purifiers, and regularly swapping out HVAC filters can significantly reduce dust buildup in the long run.

Disposing of Hazardous Materials

Don’t overlook the safe disposal of hazardous materials when dealing with post-renovation cleanup. Improper handling can lead to serious health risks, so it’s crucial to identify any hazardous substances, such as old paints or chemicals, and follow the proper disposal guidelines to keep things safe. Ensure you wear protective gear, such as dust masks and gloves, while sorting through these materials.

Awareness of the materials commonly found in renovation debris is key, as many can release harmful toxins. For example, lead-based paints and asbestos could lurk in older homes, so you need a professional inspection and abatement to handle those safely.

Familiarizing yourself with local regulations is also wise. Many authorities have strict rules about hazardous waste disposal to protect public health. Choosing the right tools for handling these materials—such as sturdy containers and proper lifting equipment—can help you avoid accidents during transport.

Prioritising safety not only shields you from immediate harm but also contributes to a healthier environment for everyone in the community.

Cleaning Up Construction Debris

Addressing Specific Surfaces and Materials

When you tackle your post-renovation cleanup, paying attention to specific surfaces and materials is essential to achieve a thorough and satisfying finish. Different surfaces—such as wood, tiles, and carpet—require special cleaning techniques to restore them to their original shine without causing damage.

And don’t overlook the windows! A good window wash can make all the difference and enhance the overall appeal of your newly renovated spaces.

Wood, Tile, and Carpet

Knowing the best techniques for cleaning wood, tile, and carpet surfaces after a renovation makes a difference. For wooden surfaces, grab some appropriate cleaning solutions that remove dirt and nourish the wood. With tiles, you’ll want to scrub with the right tools to tackle those pesky grout stains. For carpets, deep cleaning methods are your best bet to get rid of dust and any paint splatters.

Establishing a regular cleaning routine is key to keeping these surfaces looking great over time. To avoid damage, consider using a microfiber cloth and pH-balanced cleaner for wood. With tiles, sealing grout lines after your initial cleaning can help preserve them, and don’t forget to vacuum your carpets weekly to extend their lifespan.

To protect these surfaces, avoid harsh chemicals and always test any new product in a hidden spot first. By adopting these practices, you will not only preserve their appearance but also enhance the overall atmosphere of your space.

Windows and Glass

Window washing might not be at the top of your post-renovation cleanup list, but it’s a must-do task. Clean glass can brighten up your home and boost its aesthetic appeal. To achieve streak-free results, grab some eco-friendly cleaning solutions and use the proper techniques to avoid damaging your window screens and frames. Remember to protect surfaces during this cleaning to avoid any further damage.

Tools like microfibre cloths, squeegees, and gentle scrubbers can make your cleaning process much more effective, ensuring your windows remain scratch-free. For specific surfaces, you can mix diluted vinegar or biodegradable soap with warm water for a safe and effective cleaning solution that won’t harm the glass.

Establishing a regular maintenance schedule is essential—aim for every few months. This habit keeps your windows looking clear and extends their lifespan. During your cleaning sessions, look for any minor repairs or worn weather stripping. A proactive approach helps keep your windows in great shape and improves energy efficiency.

Deep Cleaning and Sanitising

Deep cleaning and sanitising your home after renovations is essential for restoring hygiene and creating a safe living space. You should pay extra attention to high-traffic areas such as the kitchen and bathroom since those areas tend to gather germs and dust during the renovation chaos.

Ensure you use cleaning solutions that clean and disinfect surfaces so your home is spotless and healthy for your family.

Kitchen and Bathroom Areas

The kitchen and bathroom areas need your attention regarding post-renovation cleaning. These spots are germ hotspots, so they require a thorough sanitisation. Start by tackling the surfaces, appliances, and fixtures with effective cleaning solutions. Don’t forget to deal with any paint splatters or debris that might have been left behind. Being meticulous helps eliminate odours and boosts the overall cleanliness of these spaces.

You can use eco-friendly cleaning products like vinegar, bicarbonate of soda, and essential oils to tackle tough stains without messing up your indoor air quality. For your kitchen surfaces, give those worktops a good wipe-down with a mix of hot water and mild detergent, and be sure to clean the splashback and cabinet fronts thoroughly.

Pay special attention to taps, showerheads, and toilet seats in the bathroom. A vinegar and water solution works wonders to prevent mould and mineral buildup. Sticking to a regular cleaning schedule, along with daily wipe-downs, will not only keep these areas sparkling but also significantly reduce the risk of bacterial growth.

High-Traffic Areas

High-traffic areas in your home, such as hallways and living rooms, usually take the biggest hit from renovation mess, so they need a solid cleaning plan. If you put together a systematic cleaning routine focused on these spots, you’ll make them look great and boost the overall success of your post-renovation clean-up. Regular maintenance will keep these areas shining long after the renovations are finished.

To keep these zones clean and inviting, it’s vital to set up a cleaning schedule that includes regular tasks such as sweeping, vacuuming, and mopping. Using handy tools such as microfiber mops and two-in-one vacuum cleaners can speed things up and simplify tackling dust and dirt. Furthermore, getting family members involved with simple tasks can create a sense of shared responsibility while helping to keep these high-traffic areas in tip-top shape.

By prioritising these spaces and taking a proactive approach to maintenance, your home can retain its charm and comfort for everyone.

Final Touches and Maintenance Tips

Adding those final touches and following maintenance tips after your post-renovation clean-up can boost your home’s appeal and help it last longer. Paying attention to details like protecting surfaces and arranging your furniture makes everything look better and helps keep your space organised.

Plus, incorporating some clever cleaning hacks can make your ongoing maintenance routine a breeze, keeping your renovation investment looking fresh for years.

Polishing and Protecting Surfaces

Polishing and protecting surfaces after your renovation is crucial for keeping them looking good and lasting longer. Make sure you use the right polishing solutions for each surface type to preserve those finishes and let them shine after all your hard work cleaning. Regular attention to surface protection can help prevent damage and extend the life of your furniture and fixtures.

But it’s not just about looking good; these techniques also create a barrier against environmental factors that can cause wear and tear. Take hardwood floors, for example—using a specialised wax or polish can shield them from scratches while giving them that gorgeous shine. And don’t forget about worktops! A high-quality sealant can resist stains and heat, helping those surfaces look fresh for longer.

It’s important to pick products that enhance the look and provide protective benefits. Sticking to a routine cleaning and polishing schedule will keep your surfaces in tip-top shape, making your space all the more inviting.

Maintaining a Clean Home After Renovations

Maintaining a clean home after renovations requires ongoing effort and a smart cleaning schedule to prevent clutter and dust from taking over. Establishing a regular cleaning routine and combining it with efficient organizational practices will make staying ahead of the mess much easier. The goal is to prevent dirt from piling up and ensure a healthy living environment for you and your family.

Consider breaking down tasks into manageable daily, weekly, and monthly routines to create a sustainable cleaning schedule. For instance, if you dedicate just 15 minutes daily to tidying up, you can significantly reduce that overwhelming clutter. Consider setting up decluttering zones where everything has its designated spot, making it easier to stay organized. Consider adopting a ‘one in, one out’ rule for new items to help keep clutter at bay.

By integrating these practices, you’re simplifying cleaning and creating a consistently pleasant and inviting atmosphere in your home. It turns upkeep from a dreaded chore into something that feels like a natural part of life.

If all this sounds like too much hassle, there is always the option of delegating the task to a professional cleaning company. Yes, it will cost you some money, but by the time you come back from picking up the weekend groceries, your renovated home will be spick and span!

Five Ways To Get The Most Out Of Your Business Cleaning Services 

Most cleaning companies expand beyond one type of customer base. They are changing their wide range of cleaning services for numerous facilities and businesses in their community.

If you want to use a cleaning business perfect for your company, read on to learn five ways to get the most out of cleaning services for your business.

Hire a cleaning company with an impeccable reputation

It is always possible to ask your cleaning company the crucial questions we will outline below, but we recommend doing so before hiring.

The most important way to check if a potential cleaning company meets your expectations is to dig into their online and customer reviews. What current and previous customers have to say about a business speaks volumes about its capabilities and level of service.

So don’t miss it!

There are additionally a couple of questions you can ask at the beginning that can save your company difficult situations eventually:

  • How many years have you been in business?
  • Are your technicians licensed, insured and tested for their positions?
  • What preparation do you provide to your employees?
  • What sort of commercial cleaning products do you offer?
  • What cleaning services do you provide, and what kind of equipment do you use for them?
  • How do you assess performance quality?
  • Do you offer a comprehensive written contract?
  • What payment politics do you accept, and what is your billing period?
  • How can I communicate with you to solve problems?

Knowing the solutions to these inquiries gives you the data you want to settle on informed choices, so don’t hesitate for even a moment to inquire as to whether the candidate you are meeting is the right one.

The advantages of hiring a professional cleaning contractor

Proper commercial cleaning equipment is important

Modern technology allows cleaning experts to remove more dirt, stains and germs quickly. However, to achieve the declared level of disinfection, each piece of commercial cleaning equipment must be used appropriately as intended.

For this reason, you will want to make sure that you partner with a cleaning business with a large and well-maintained selection of machines and tools, such as:

  • Carpet cleaning machines and stain removal equipment
  • Upholstery cleaning equipment
  • Pressure washers
  • Floor maintenance machines such as vacuum cleaners, wax removers, polishers, etc.
  • Commercial-grade cleaning solutions
  • Dry mops and brooms of commercial class
  • Toilet cleaning equipment
  • Commercial-grade microfibre towels
  • Tools against a high degree of dust
  • Protective equipment

Another thing to remember is the level of training each cleaner has received for each piece of equipment. Is it adequate? Does it comply with the safety rules that your company has?

Remember to carefully consider the answers to these questions before making your choice. Security breaches can significantly affect your ability to do business.

Take advantage of deep-cleaning services

In recent years, microbes, bacteria and viruses have come first for all local businesses.

Do you take advantage of the deep cleaning services your office cleaners provide? If you haven’t done so, it may be time to renegotiate your contract to include up-to-date protocols to help you improve the continuing safety of your work environment. Consider increasing the frequency of services such as:

  • Hi-touch disinfection of surfaces
  • Disinfection of high-traffic areas
  • Deep cleaning of carpets
  • Toilet disinfection
  • Disinfection of the kitchen area
  • Disinfection of the boardroom
  • Upholstery disinfection

Deep cleaning lessens the chance of microbes spreading among your workforce and clientele and contributes to a positive and productive work environment. Do your cleaning contractors do their part to provide you with an intensive disinfection strategy?

If the answer to this question is not an enthusiastic “yes”, it may be time to look for professional teams that provide the services that your business needs.

Is your commercial cleaning service flexible enough to meet the needs of your business?

Flexibility allows you to refine any commercial cleaning service to perfectly complement your company’s goals.

If your contract seems strict, we suggest you reconsider your choice of supplier.
To be successful in today’s situation, local businesses had to adapt in unprecedented ways. That includes implementing new clean-up plans that address the spread of viruses such as COVID-19 and related variants.
But being flexible means more than increasing cleaning services to meet current demand. It is also about providing the services you need – when you need them.
If your company would benefit more from providing cleaning services during certain hours, the cleaning company you choose should be fine fulfilling your wishes.

Can customisation and flexible choices improve your company’s relationship with your commercial cleaning service provider? It is always a good idea to book a consultation to look at your options in more detail.

Can your company benefit from green cleaning solutions?

If you’ve never seen green cleaning solutions as a potential profit for your business, this may be an excellent time to start.

As an ever-increasing number of buyers focus on ecological worries, businesses are stepping up to fulfil their role. One of the ways your company can show customers that you are listening to their wishes is to adopt green cleaning initiatives throughout the company. Some of the benefits of going green include:

  • Reduction of exposure to toxic chemicals
  • Significantly reduced environmental impact
  • Improved air quality
  • Reduced long-term damage to your property
  • Effective and affordable alternative to traditional dry cleaners
  • Your brand stands out from the rest

Many of our region’s leading cleaning service providers already offer green cleaning programs that can be customised to your exact needs. There is non-obligation counselling for anyone who wants to learn more.

The way companies use cleaning services is changing. Stay up to date with these changes.

Check it if it’s been a while since you’ve seriously reviewed your cleaning contract.
With so many things happening daily, it is easy to ignore or postpone for a more appropriate time.

The danger is that your company will miss opportunities that lead to your overall success.

Let’s leave you with this professional advice:

Take the time to review your cleaning service contract. Does your company already follow some of the above strategies?

Are You Ready For The Next Step In Your Cleaning Career?

Growth and evolution are natural processes in life and should also apply in your professional field. You cannot stay put forever, doing the same thing over and over again as the years pass you by. For me, the ambition to become better and more skilled at my job, to take on greater challenges and strive for the top tier of my industry has always been the driving force that made me get out of bed at 6 in the morning and working till late in the evening.

I have been in the cleaning industry for more than two decades now, and I will be the first to admit that I never foresaw this journey. Back in the day, I thought it was an easy job that paid relatively well, and did not require any specific accreditations. I could not have been more wrong. Soon I realised I had three paths ahead of me – to remain a low-tier cleaner, to start learning fast and aspire to create my own business or to leave the industry altogether.

Option one was never really in the picture – I am too ambitious a person to drift along. For the time being, I decided to eliminate the third option as well and concentrate entirely on the second one. I am sure hundreds, if not thousands of executives can recognise themselves in the same description. I will, however, write specifically about the cleaning industry and share my story of professional advancement and how I went about the different stages of it.

The Learning Curve

Let’s call stage number one the “learning curve”. You may hear the old cleaners boast that you can never learn everything about the different fields of sanitary upkeep. While this is undoubtedly true, you can pick up a lot in a very short time. It took me about six months to become a decent house cleaner and twelve more to start acquiring the next-level skills you need to make the next step.

What would that step be? I do not know a single cleaner who hasn’t started working on homes, doing basic-level housekeeping or window cleaning. The next step would be to aim for the more specific fields of sanitary work like carpet, rug or upholstery cleaning or service packages that require more versatile skills like end of tenancy cleaning or after-builders clean-ups. In other words, you improve your portfolio and include more cleaning options in your professional resume.

Let’s assume you have started your career in an already established contractor as a junior cleaner. You know you have reached the next step when your manager/supervisor/boss calls you one day and tells you that you have to teach the fresh recruits everything you know, and quickly. Be very careful at this crucial point, as it may determine the whole outlook of your future career. Many people make the mistake of considering this a promotion – though it is, in fact, the opposite. You get to work more, you take responsibility for other people, and you rarely get a pay raise. How is that a promotion exactly? Managers, however, rely on the centuries-old trick of rights and privileges – if they convince you that you are closer to the management than the average worker, you may overlook the already mentioned negatives.

Making The Crucial Step

I did not overlook them, though. I knew it was my time to move forward. I left my job and decided to start my own business, which leads me to the next stage. It is arguably the trickiest one of them all – I call it the “trust” phase. There is no way you can run a successful cleaning business on your own. You need a team of like-minded professionals who share your passion, and an administrative team to put it effectively into action. I strongly recommend that you do not make any compromises with the first people you hire – you must trust them wholeheartedly and be willing to delegate the full set of tasks that a cleaning business faces daily.

It is only the start of your journey as a manager, though. Even at such an early stage, you have to set your goals and priorities straight. Where do you want to be in two or five years? How quickly do you want to achieve your immediate goals? Do not let the mundane stuff cloud your perspective – you must be able to separate yourself from the small-scale problems and look at the big picture.

In the cleaning industry, this big picture is pretty simple – are you going to make the decisive step into commercial cleaning or not. A lot of local or small sanitary businesses are content to remain in the residential sector, which is perfectly fine. What are the necessary watershed marks you need to achieve before you make the fateful leap into the unknown?

Are You Ready To Go Into Commercial Cleaning?

First and foremost, your staff. It will be a catastrophic mistake even to contact a large-scale business with a sanitary proposal unless you have the people to perform it. Trust me, you cannot imagine the volume of work you will have to cover every day – it has nothing to do with the housekeeping appointments you have known so far. There is no such thing as too many cleaners when it comes to office or commercial cleaning jobs – if your company has less than twenty technicians right now, you should concentrate on building up your team first.

Second but equally important, the available funds for investment. If you want to be competitive and efficient, you will have to purchase the requisite equipment for the job – and it does not come cheap. You will need much bigger funds for detergents and additional tools before you can cash in the first monthly billing. If you are not sure about that, sit down with your accountant and have an open and honest evaluation of your spending range and the average monthly turnover you expect.

The third issue is often overlooked by aspiring managers who want to take the next step for their company. I myself did not pay attention to it before I faced its consequences. It is the higher levels of stress you experience every day. Let’s be honest – housekeeping can prove very easygoing, especially if you build a friendly and accommodating relationship with your customers. There is no such chance in commercial cleaning, where you always have to be on edge, on top of your game, chasing deadlines, settling conflicts or further requirements.

As you can see, going into corporate and office cleaning is not for everybody – if you prefer the leisurely speed and routine of domestic cleaning, you should stay in your comfort zone. If, however, you are all about the challenge and dynamic pace of cleaning, give it a try – the lessons you will learn about yourself and your company will be priceless!

« Older posts